Proxmox
Proxmox is the hypervisor that I am using on most of my hardware.
I am using it over Portainer and kubernetes for ease of use and feature set.
Traefik
homelab/pve/traefik/conf.d/proxmox.yaml
---
http:
 #region routers
  routers:
    proxmox01:
      entryPoints:
        - "websecure"
      rule: "Host(`pve01.l.nicholaswilde.io`)"
      middlewares:
        - default-headers@file
        - https-redirectscheme@file
      tls: {}
      service: proxmox01
    proxmox02:
      entryPoints:
        - "websecure"
      rule: "Host(`pve02.l.nicholaswilde.io`)"
      middlewares:
        - default-headers@file
        - https-redirectscheme@file
      tls: {}
      service: proxmox02
    proxmox03:
      entryPoints:
        - "websecure"
      rule: "Host(`pve03.l.nicholaswilde.io`)"
      middlewares:
        - default-headers@file
        - https-redirectscheme@file
      tls: {}
      service: proxmox03
    proxmox04:
      entryPoints:
        - "websecure"
      rule: "Host(`pve04.l.nicholaswilde.io`)"
      middlewares:
        - default-headers@file
        - https-redirectscheme@file
      tls: {}
      service: proxmox04

#endregion
#region services
  services:
    proxmox01:
      loadBalancer:
        servers:
          - url: "https://192.168.2.128:8006"
        passHostHeader: true
    proxmox02:
      loadBalancer:
        servers:
          - url: "https://192.168.2.88:8006"
        passHostHeader: true
    proxmox03:
      loadBalancer:
        servers:
          - url: "https://192.168.2.143:8006"
        passHostHeader: true
    proxmox04:
      loadBalancer:
        servers:
          - url: "https://192.168.2.67:8006"
        passHostHeader: true


#endregion
 Post Installation
Default Port: 8006
Post Install
Add LXC IP Tag
Update
Datacenter NFS Volumes
GUI: Datacenter -> Storage -> Add -> NFS
pve-backups
ID: pve-backups
Server: omv.l.nicholaswilde.io
Export: /export/pve-backups
pve-shared
ID: pve-shared
Server: omv.l.nicholaswilde.io
Export: /export/pve-shared
Reset Cluster Info
How to reset cluster. Useful if the node IP isn't matching during join.
node
The node is now separated from the cluster. You can deleted it from any remaining node of the cluster
If the command fails due to a loss of quorum in the remaining node, set the expected votes to 1 as a workaround
And then repeat the pvecm delnode command.
Now switch back to the separated node and delete all the remaining cluster files on it. This ensures that the node can be added to another cluster again without problems.
As the configuration files from the other nodes are still in the cluster file system, you may want to clean those up too. After making absolutely sure that you have the correct node name, you can simply remove the entire directory recursively from /etc/pve/nodes/NODENAME.
Warning
The node’s SSH keys will remain in the authorized_key file. This means that the nodes can still connect to each other with public key authentication. You should fix this by removing the respective keys from the /etc/pve/priv/authorized_keys file.
 Cluster IP Change
When changing the IP address of a node in a cluster, the following files need to be updated:
/etc/hosts/etc/network/interfaces/etc/corosync/corosync.conf
Static IP
 Node
Node
WIP
 Container
WIP
 VM
VM
WIP
authentik
Proxmox GUI
Datacenter -> Permissions -> Realms
Issuer URL: http://authentik.l.nicholaswilde.io/application/o/proxmox
Realm: authentik
Client ID: from authentik
Client Key: from authentik
Autocreate Users: 
Username Claim: username
Create a Volume Group
Create a [P]hysical [V]olume (PV) without confirmation and 250K metadatasize.
Create a LVM-thin pool
Resize LXC Disks
Tip
This can be done from the GUI, but sometimes the LXC doesn't register the change.
From node
Resize VM LVM Disks
Note
This procedure assumes that your VM file system is using LVM, such as Ubuntu.
 Step 1: Increase/resize disk from GUI console
Step 2: Extend physical drive partition
From inside of the VM, not from the control node.
TL;DR
See physical drive
Check physical drive if has changed
 Step 3: Extend Logical volume
Resize LV
 Step 4: Resize Filesystem
Confirm results
Disk /dev/sda: 60 GiB, 64424509440 bytes, 125829120 sectors
Disk model: QEMU HARDDISK
Units: sectors of 1 * 512 = 512 bytes
Sector size (logical/physical): 512 bytes / 512 bytes
I/O size (minimum/optimal): 512 bytes / 512 bytes
Disklabel type: gpt
Disk identifier: C4F18461-1027-4C82-82F5-AA8A9A8F5098

Device       Start       End   Sectors  Size Type
/dev/sda1     2048      4095      2048    1M BIOS boot
/dev/sda2     4096   3674111   3670016  1.8G Linux filesystem
/dev/sda3  3674112 125829086 122154975 58.2G Linux filesystem


Disk /dev/mapper/ubuntu--vg-ubuntu--lv: 58.25 GiB, 62541266944 bytes, 122150912 sectors
Units: sectors of 1 * 512 = 512 bytes
Sector size (logical/physical): 512 bytes / 512 bytes
I/O size (minimum/optimal): 512 bytes / 512 bytes
 private key /root/.ssh/id_rsa contents do not match
Run on all nodes
Pass Disk to VM
Kill Backup Job
 Email Notifications using Gmail
Enable 2FA for the gmail account that will be used by going to security settings.
Create app password for the account.
- Go to App Passwords
- Select app:
Mail - Select device:
Other - Type in:
Proxmoxor whatever you want here
Write gmail credentials to file and hash it
echo "smtp.gmail.com [email protected]:yourpassword" > /etc/postfix/sasl_passwd
Warning
Comment out the existing line containing just relayhost= since we are using this key in our configuration we just pasted in.
Append the following to the end of the file: /etc/postfix/main.cf and comment out relayhost=
mydestination = $myhostname, localhost.$mydomain, localhost
# relayhost =
mynetworks = 127.0.0.0/8
inet_interfaces = loopback-only
recipient_delimiter = +

compatibility = 2

relayhost = smtp.gmail.com:587
smtp_use_tls = yes
smtp_sasl_auth_enable = yes
smtp_sasl_security_options =
smtp_sasl_password_maps = hash:/etc/postfix/sasl_passwd
smtp_tls_CAfile = /etc/ssl/certs/Entrust_Root_Certification_Authority.pem
smtp_tls_session_cache_database = btree:/var/lib/postfix/smtp_tls_session_cache
smtp_tls_session_cache_timeout = 3600s
Example Screenshot

Test to make sure everything is hunky-dory
echo "sample message" | mail -s "sample subject" [email protected]
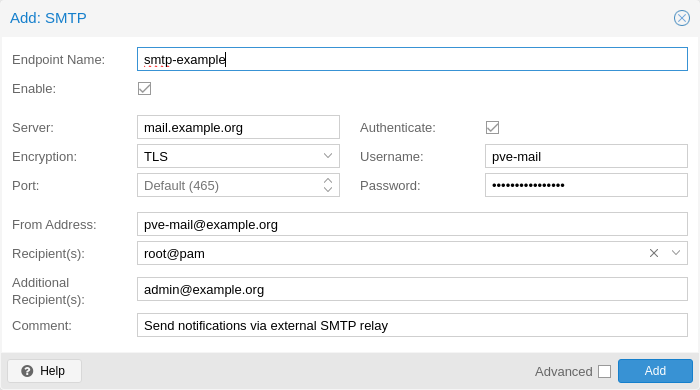
 SMTP Setup
Proxmox GUI
Server: smtp.gmail.com
Encryption: STARTTLS
Port: 587
Authenticate:
Username: [email protected]
Password: password
From Address: [email protected]
Recipient(s): root@pam
Addtional Recipient(s): [email protected]
/etc/pve/notifications.cfg
smtp: example
        mailto-user root@pam
        mailto-user admin@pve
        mailto [email protected]
        from-address [email protected]
        username pve1
        server mail.example.com
        mode starttls
The matching entry in /etc/pve/priv/notifications.cfg, containing the secret token
Targets to notify
WIP
VM Trim
It tells your VM to report all deleted (unused) blocks to the hypervisor (like Proxmox, VMware, etc.) so the host system can reclaim that storage space.
This is especially important for thinly-provisioned disks.
Here’s a breakdown of the command and the process:
-
sudo: Runs the command as the 'root' superuser, which is required. -
fstrim: The command to "trim" or discard unused blocks. -
-a: (all) Runs the command on all mounted filesystems that support it. -
-v: (verbose) Prints out how much space was trimmed from each filesystem.
QDevice
How to add a Raspberry Pi to a Proxmox cluster that only has two nodes.
Raspberry Pi
Install the corosync-qnetd package
Allow root SSH Login
Restart service
Change root password
View the IP address
PVE Nodes
Install the corosync-qdevice package on all nodes
Check the results
Theme Switching - ProxMorph
Install
Apply Theme
- Hard refresh browser (Ctrl+Shift+R)
- Click username → Color Theme
- Select a ProxMorph theme
 References